Bambu Ironing Settings Guide: What Actually Makes Top Surfaces Look Finished
Quick answer
Ironing re-melts the top layer of a flat surface after it has already solidified, smoothing it to a finish closer to sanded plastic than raw layer lines. It works best on flat, horizontal top faces of PLA and PETG prints, it does almost nothing on sides or textured surfaces, and it will ruin silk or matte finishes. The settings that matter in Bambu Studio are ironing type, flow, and line spacing — not a temperature slider or a pass count.
You print a part. It is technically fine. The dimensions are right, the walls are solid, nothing failed. And the top surface looks like a honeycomb made by someone who was trying.
That is the problem ironing was built to solve, and it is one of those settings where the name undersells what it does. "Ironing" sounds like a small finishing pass. In practice it is the difference between "3D printed" and "machined" on any flat top face.

What Ironing Actually Does
Here is the mechanism, because the mechanism is what determines whether it helps you or not. When ironing is enabled, after the printer lays down the top layers of a flat surface, the nozzle passes over those layers one more time. It does not deposit material. It melts the already-solidified top surface, letting the plastic flow and settle into a flat plane before cooling.
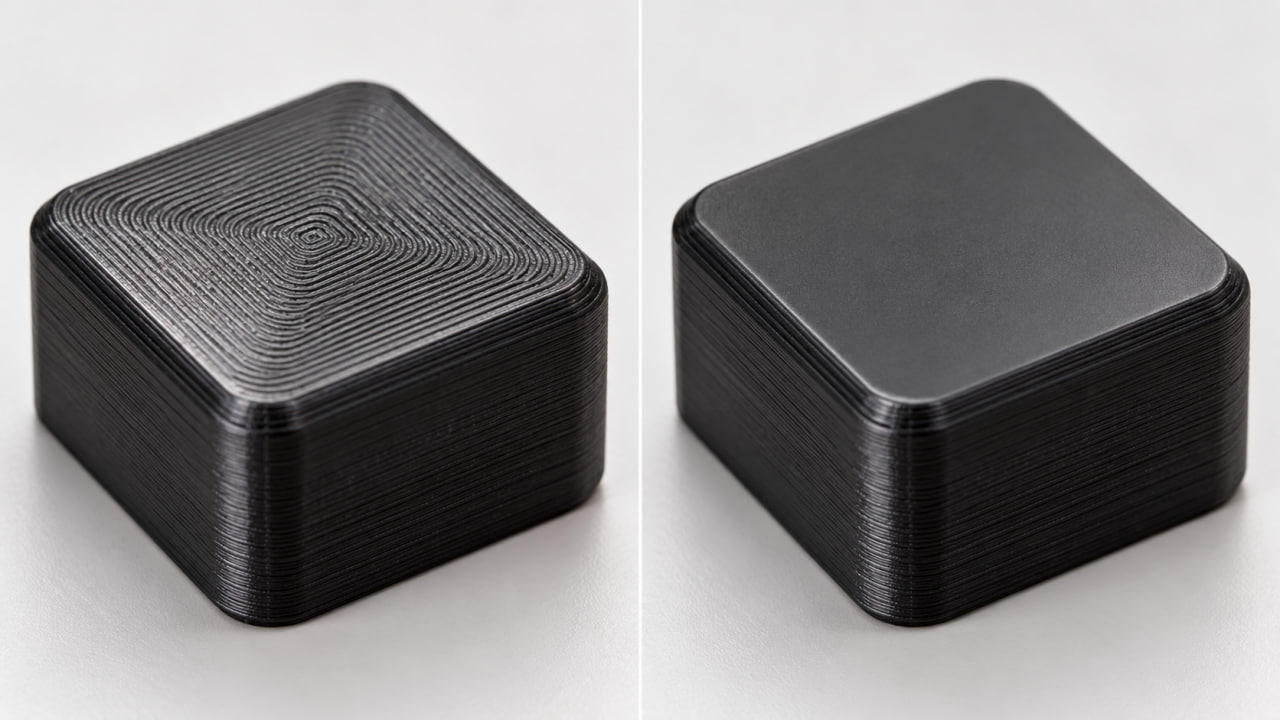
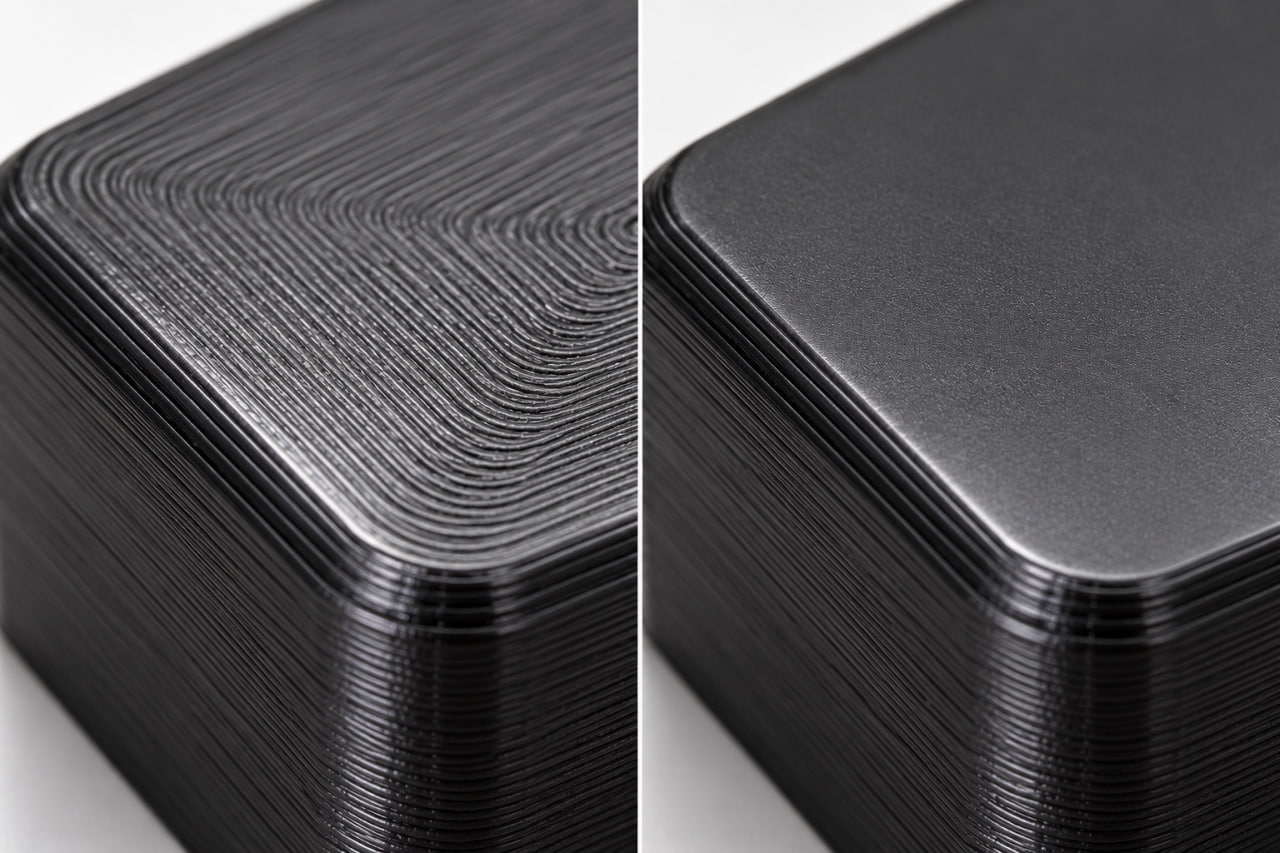
The result is a surface that is closer to a poured resin or a sanded finish than a layered one. You can see this most clearly in the before and after photos, where the "after" side has the same layer structure underneath but the top reads as a single flat plane rather than a stack of rings.
The important thing to understand is what it does not do. It does not change the side walls. It does not affect textured or detailed top surfaces. It does not make a bad print good. It takes a flat top face that is already mostly right and pushes it the last two percent into looking finished.
Which Materials Benefit Most
Not all filaments respond to ironing the same way, and the difference is not subtle. Here is what the test bed showed:
| Material | Ironing result | Note |
|---|---|---|
| PLA Basic (solid color) | Strong improvement | Best case. Flat top goes from layered to glass-smooth. |
| PLA Basic (black) | Strongest improvement | Black makes the contrast most visible. Best material for testing. |
| PETG | Moderate improvement | Works, but PETG is stickier. Watch for stringing on the iron pass. |
| PLA Matte | Ruins the finish | Matte is the whole point. Ironing makes it glossy and uneven. |
| PLA Silk | Ruins the finish | Silk shine is directional. Ironing destroys it. |
| ABS / ASA | Works but warping risk | Extra heat on the top surface can lift corners on thin parts. |

The material rule
If the finish you want is the point, ironing is the wrong tool. Matte and silk are finishes that exist because of their surface, and ironing erases that surface. Use ironing when you want smooth, not when you want a specific look.
The Settings That Actually Matter
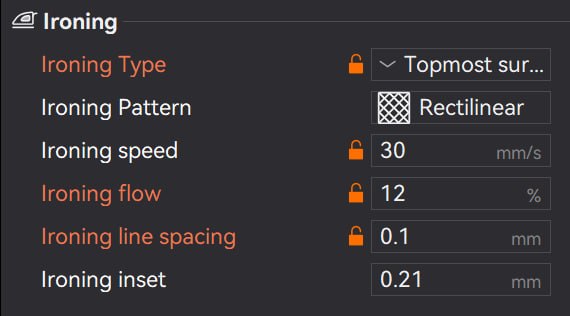
The ironing settings in Bambu Studio look like a small cluster of options, but most of them are noise. Two settings do most of the work, and one setting is a trap.
Ironing type. This is the one that matters most. Set it to Topmost surface, which is the default. That restricts ironing to the flat, horizontal top faces only, and excludes any angled or textured surfaces. If you see an option to iron every top layer or every surface, leave it off. Ironing on a curved or detailed top face creates an uneven sheen that looks worse than the original surface.
Ironing flow. This is the amount of material the nozzle lays down on the ironing pass. Twelve percent is the default and it works well for PLA. If your top surface still shows faint ring lines after one pass, bump it to fifteen or eighteen percent. If the surface starts to look like it is sagging or the nozzle is dragging, drop it back to ten percent. This is the one slider you will actually tune.
Ironing line spacing. Zero point one millimeter is the default and it is fine. Tighter spacing gives a smoother result at the cost of more time. Wider spacing is faster but leaves a faint pattern on large flat surfaces. For most prints the default is correct.

The setting nobody talks about
The heated platform's flatness calibration matters more than any ironing slider. If your bed is not flat, ironing is just a fancy way of spreading an uneven surface evenly. Calibrate the bed first. Then iron.
When to Skip Ironing Entirely
Ironing adds time to every print. The iron pass itself is slow, and on a large flat surface it can add a meaningful chunk to the total print time. That is fine if the surface matters. It is not fine if you are printing a functional part that will live inside a cabinet, or a prototype that you are going to sand anyway.
The honest cost benefit: for a small print with a 50mm flat top, ironing adds maybe two or three minutes. For a large plate or enclosure panel, it can add ten or fifteen. On a production run of twenty parts, that is a real number. The rule is simple: if the top face is not visible in the end use, skip it. If it is visible and the material is a solid color, run it.
What to Buy If You Are Chasing This Finish
The filament is the only purchase that matters for ironing quality. A reliable PLA Basic in the color you want is the best test material, and a PLA+ gives you a second data point to make sure the result is not brand-specific.
The printer does not need to be anything special. Any Bambu Lab X-series or P-series handles ironing well, and the X2D is the current flagship if you are shopping for a new machine. The X1C is no longer in production, so if you see it listed, it is leftover stock and you should price the X2D instead.
One more thing before you go. If your prints are warping or your first layer is not sticking, ironing is not going to fix that. It is a finishing pass, not a foundation fix. If the base is unstable, the top is going to be too, no matter how many passes you run.
These tests were run on a Bambu Lab X-series printer. The X1C is now end-of-life, so if you are shopping for a current machine the X2D is the direct successor and handles ironing the same way.