Infill Patterns: What Actually Matters in 2026 (We Printed All 7 to Find Out)
Quick answer
Some links below may earn us a small commission at no extra cost to you. That keeps PrintedByJuno running and lets us keep printing and testing. We only link gear we'd actually use.
Here's the thing most people get about infill backwards. You don't pick an infill pattern because of the name, and you don't pick it because the slicer defaulted to it. You pick it because of three things: how stiff the part needs to be, how fast you want it, and how much stringing you're willing to live with in the finished piece.
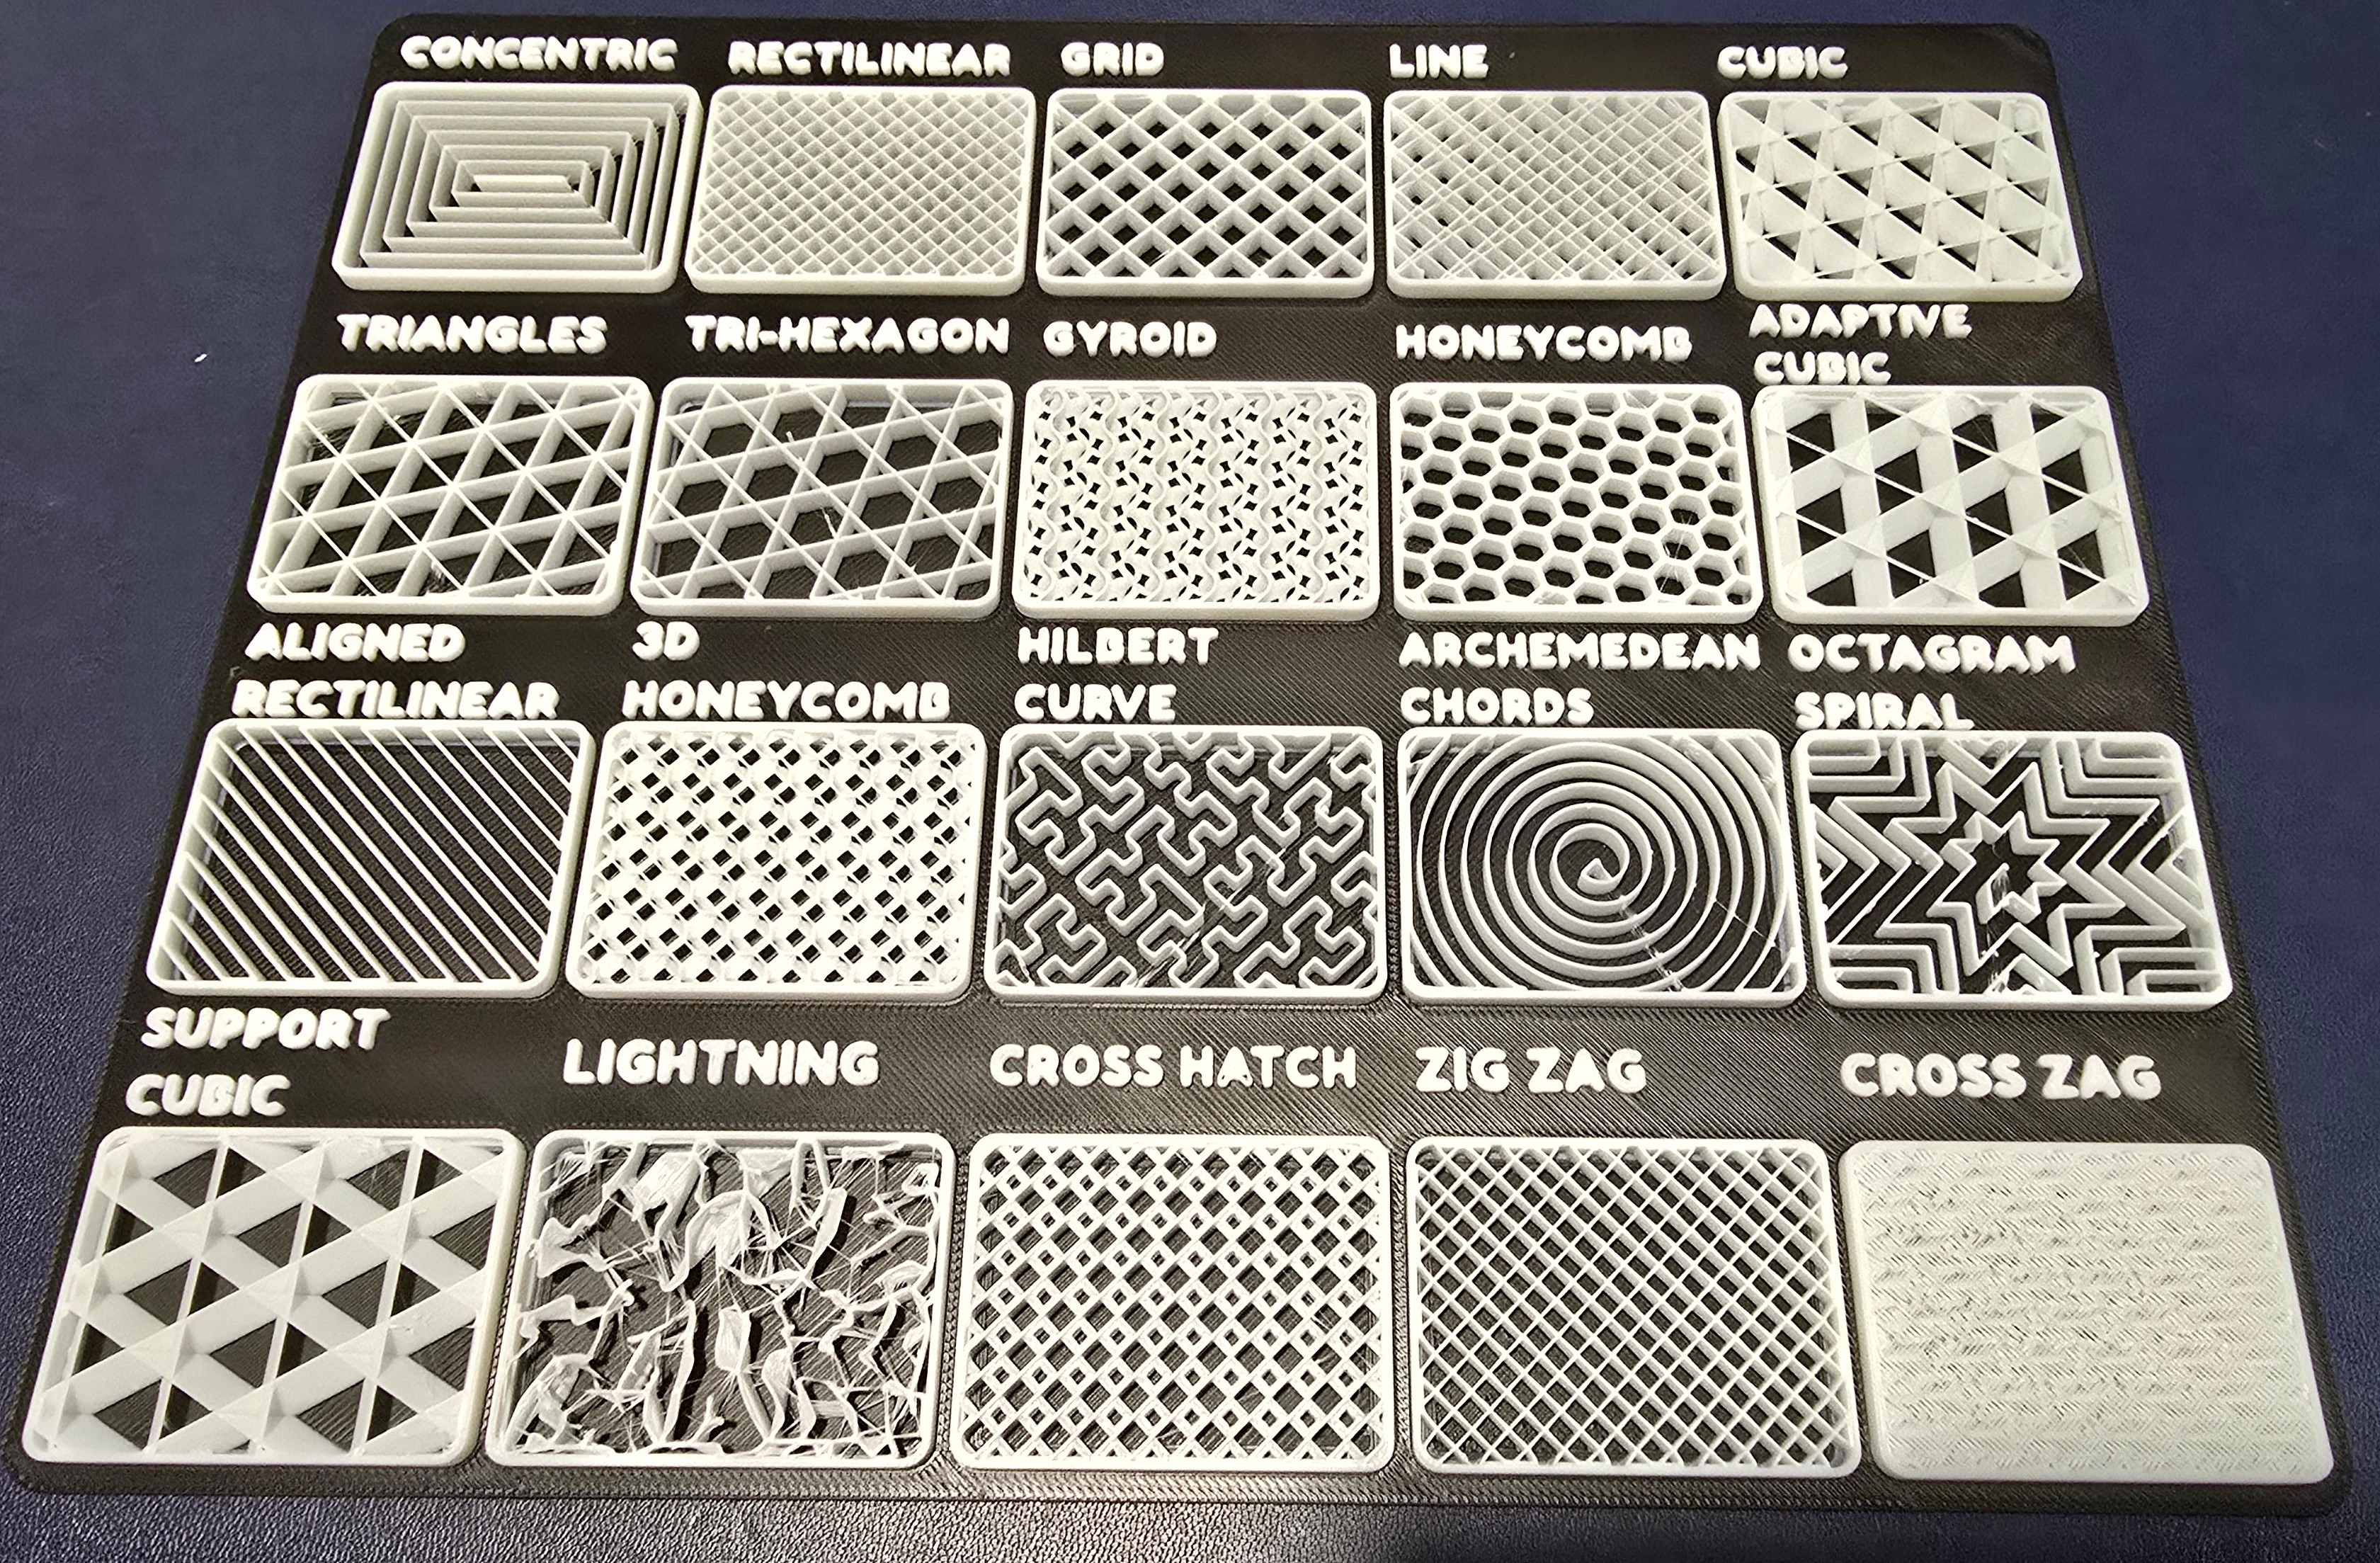
We built a single test panel and printed every infill pattern in it one tile at a time. Then — and this is the part we want to be upfront about — we left the stringing in. We didn't scrape it, didn't wet-sand it, didn't hide it. We wanted to show you what the patterns actually do to a real part, including the mess.
Here's what we found.
What infill actually is (and isn't)
Infill is the interior structure of a print — the stuff between your outer walls. It's not decoration; you'll never see most of it. What it does is carry load, tie the walls together, and — depending on the pattern — either hide the stringing it produces or put it on display.
Two settings control it. The first is infill density — the percentage — which decides how much material goes in. The second is the pattern, which decides how that material is laid down. Most tutorials treat the pattern as an afterthought. For a part you're going to hold, snap, or show off, the pattern is usually where the real difference lives.
The three things that actually matter
1. Stiffness
Some patterns load well in every direction, some load well only in the directions their lines run. If a part gets twisted or pulled from different angles, a pattern that's stiff only one way will let it flex where it shouldn't.
2. Speed and material
Patterns that travel long distances between their own lines (long straight runs, wide open cells) spend more time air-travelling and lay material in a way that makes any stringing you do produce much more visible. Compact toolpaths hide the strands; open ones put them on display.
3. Stringing
This is the one we care about most, and the one we left in the photos. First, the honest part: the amount of stringing is set by your retraction, temperature, flow, and how dry your filament is — not by the pattern name. A stringy machine will string on gyroid too. But the pattern still matters a lot, because it decides how visible the strands are. Every time the nozzle crosses open space to get to the next line, the strands it drags have nowhere to hide — they sit in plain sight across the cell. On a compact pattern, the same strands land on top of existing lines and mostly disappear. Same machine, same settings, two very different-looking results.
The patterns, ranked by what they're actually good for
| Pattern | What it's good for | Pick |
|---|---|---|
| Gyroid | The default for a reason — strong in nearly every direction, and its compact wavy toolpath hides any stringing it does produce. | Best for most prints |
| Cubic / Adaptive cubic | Stiff and predictable; adaptive version varies density through the part to save material where it can. | Best for stiff boxes and brackets |
| Grid / Rectilinear | Cheap and fast, but the long straight runs are where stringing shows up first. | Best for speed and drafts |
| Triangular / Tri-hexagon | Stiff for the material, and the diagonal paths string more than you'd expect. | Best for strength-per-gram on flat parts |
| Honeycomb / Archimedean | Light and open, but the wide cells are stringing magnets. | Best when weight matters and you'll clean up |
| Concentric / Contour | Compact toolpath that hides any stringing it does produce — the strands stay close to the lines rather than spanning open cells. | Best when a clean-looking finish matters |
| Lightning | Clever material-saver that connects only what's needed — and it can look like spaghetti until you get it right. | Best for hollow parts, with practice |
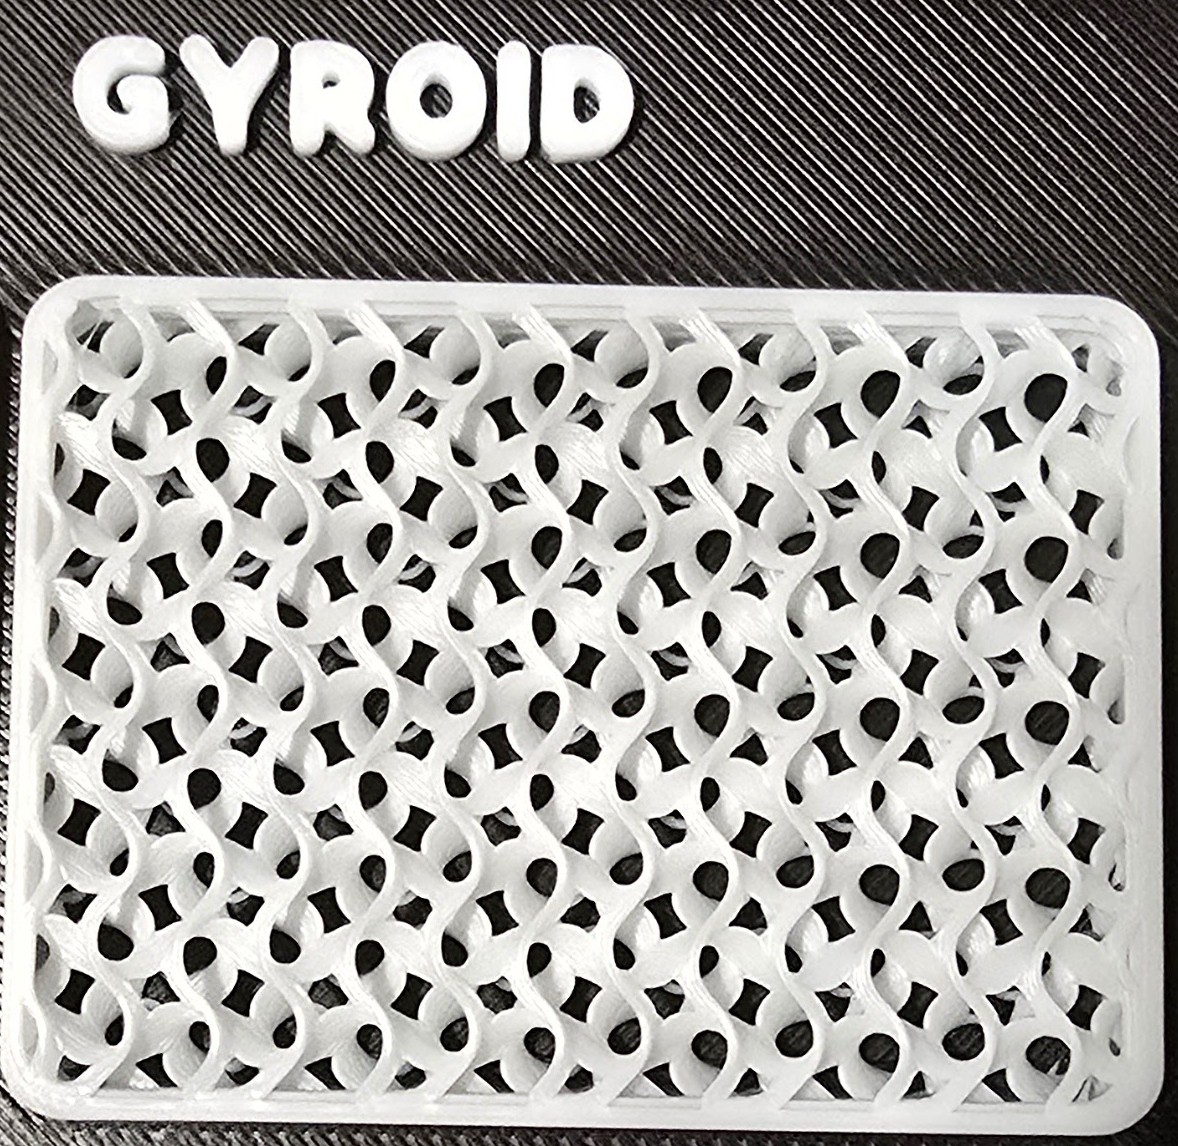
Gyroid: why it's the default
Gyroid is a continuous, wavy surface that curves in three dimensions. That shape gives it something the other patterns can't match in practice: it's stiff in nearly every direction with the same amount of material. There's no grain to the infill, no "strong this way, weak that way" — load it from any horizontal angle and it distributes it the same way. (It's still FDM, so the usual layer-to-layer and Z-direction weakness applies like any other pattern.)
It's also the slicer's default for a reason beyond laziness. It's the safe choice, which means when you don't have a specific reason to do otherwise, gyroid at a reasonable density is the pattern you want.
Where stringing shows up — and why we left it in
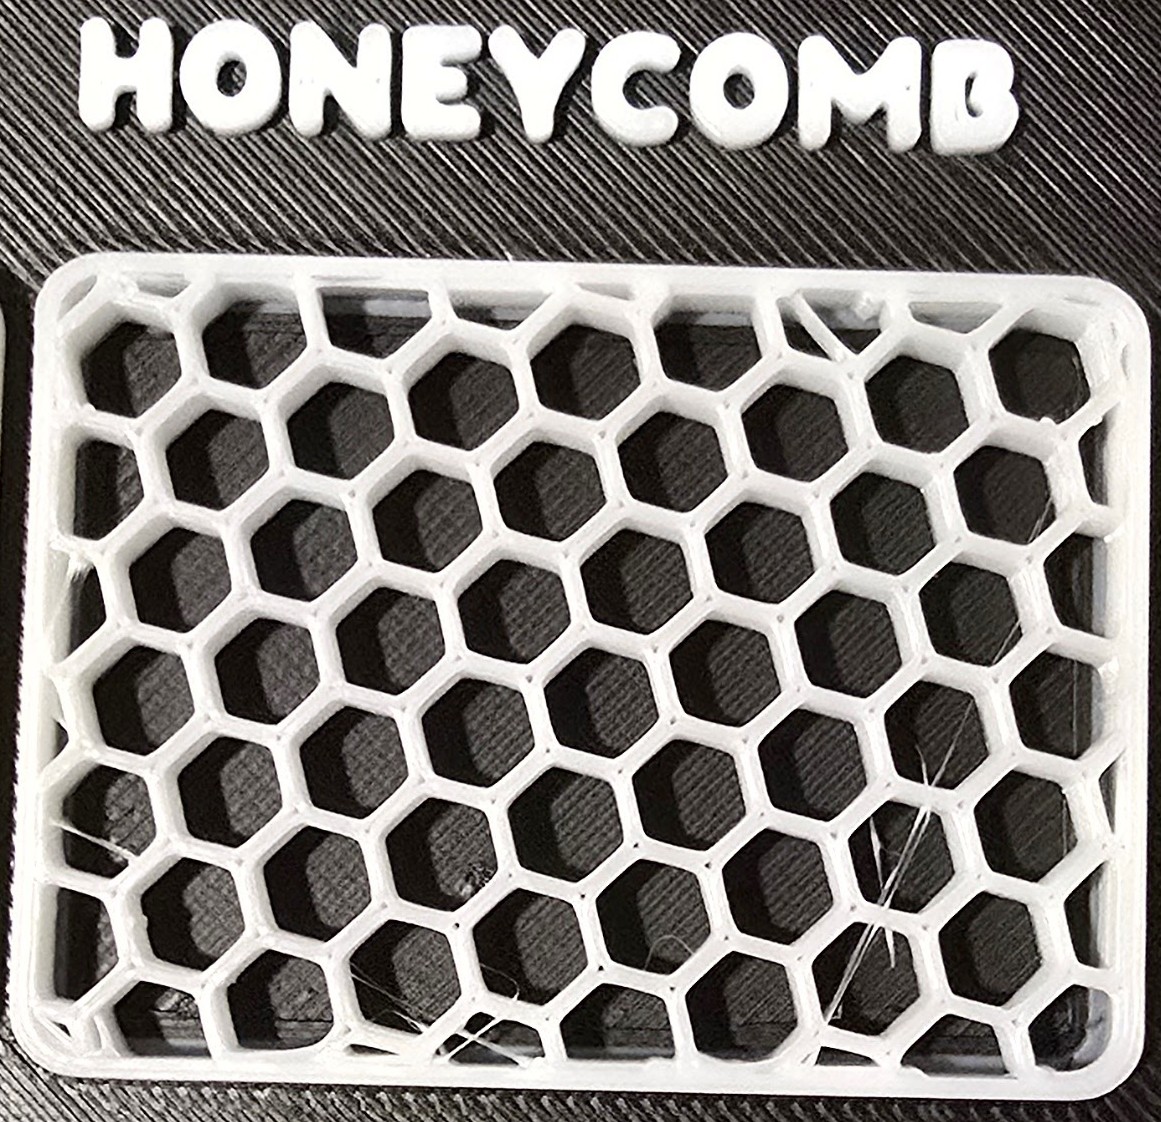
Now the part we want to be honest about. Several of these patterns are stringing risks, and we don't think that's a secret. Look at the honeycomb tile on the panel. There's a lattice of fine white strands across the hexes. That's not a print defect in the sense that something went wrong. Honeycomb and archimedean-style infill have wide open cells, which means the nozzle crosses empty space to get to the next line, and every one of those strands has nowhere to hide. The machine was stringing — retraction, temperature, dry filament are what set how much — but the open cells put every strand on display.
Grid, rectilinear, and the cross-hatch family are in the same boat. Long, straight runs across open space are the classic stringing setup. Triangular is a little different — it's dense and stiff, but the diagonal paths still travel enough to leave strands if your settings aren't dialed in.
Here's the honest tradeoff we'd rather you make than discover on a part you wanted to keep. Open, low-material patterns are cheaper and faster, but any stringing you produce is highly visible. Tighter, more compact patterns hide that same stringing, but cost more material and time. The pattern doesn't stop the stringing — your settings do — but it decides whether you'll see it. The pattern isn't a free lunch. It's a choice about where you spend.
The stringing risk, named directly
We'd rather tell you this in the article than have you find it on a finished piece. If a pattern has wide open cells — honeycomb, archimedean chords, cross hatch, grid, rectilinear — and your machine strings at all, you will see it. Not because the pattern is making the stringing — your retraction and temperature are doing that — but because the open cells give the strands nowhere to hide. The only real question is whether you're willing to live with the strands, clean them off after, or pick a pattern that buries them.
If a clean-looking finish matters and you're not going to clean up, a compact pattern like concentric or gyroid is the practical choice: the strands land on top of existing lines and mostly disappear, whereas on an open-cell pattern they sit in plain sight. And if the stringing is bad in the first place, the real levers are retraction, temperature, dry filament, and your slicer's combing setting — all of which we break down in our guide to fixing stringing.
Lightning: the clever one that can look terrible
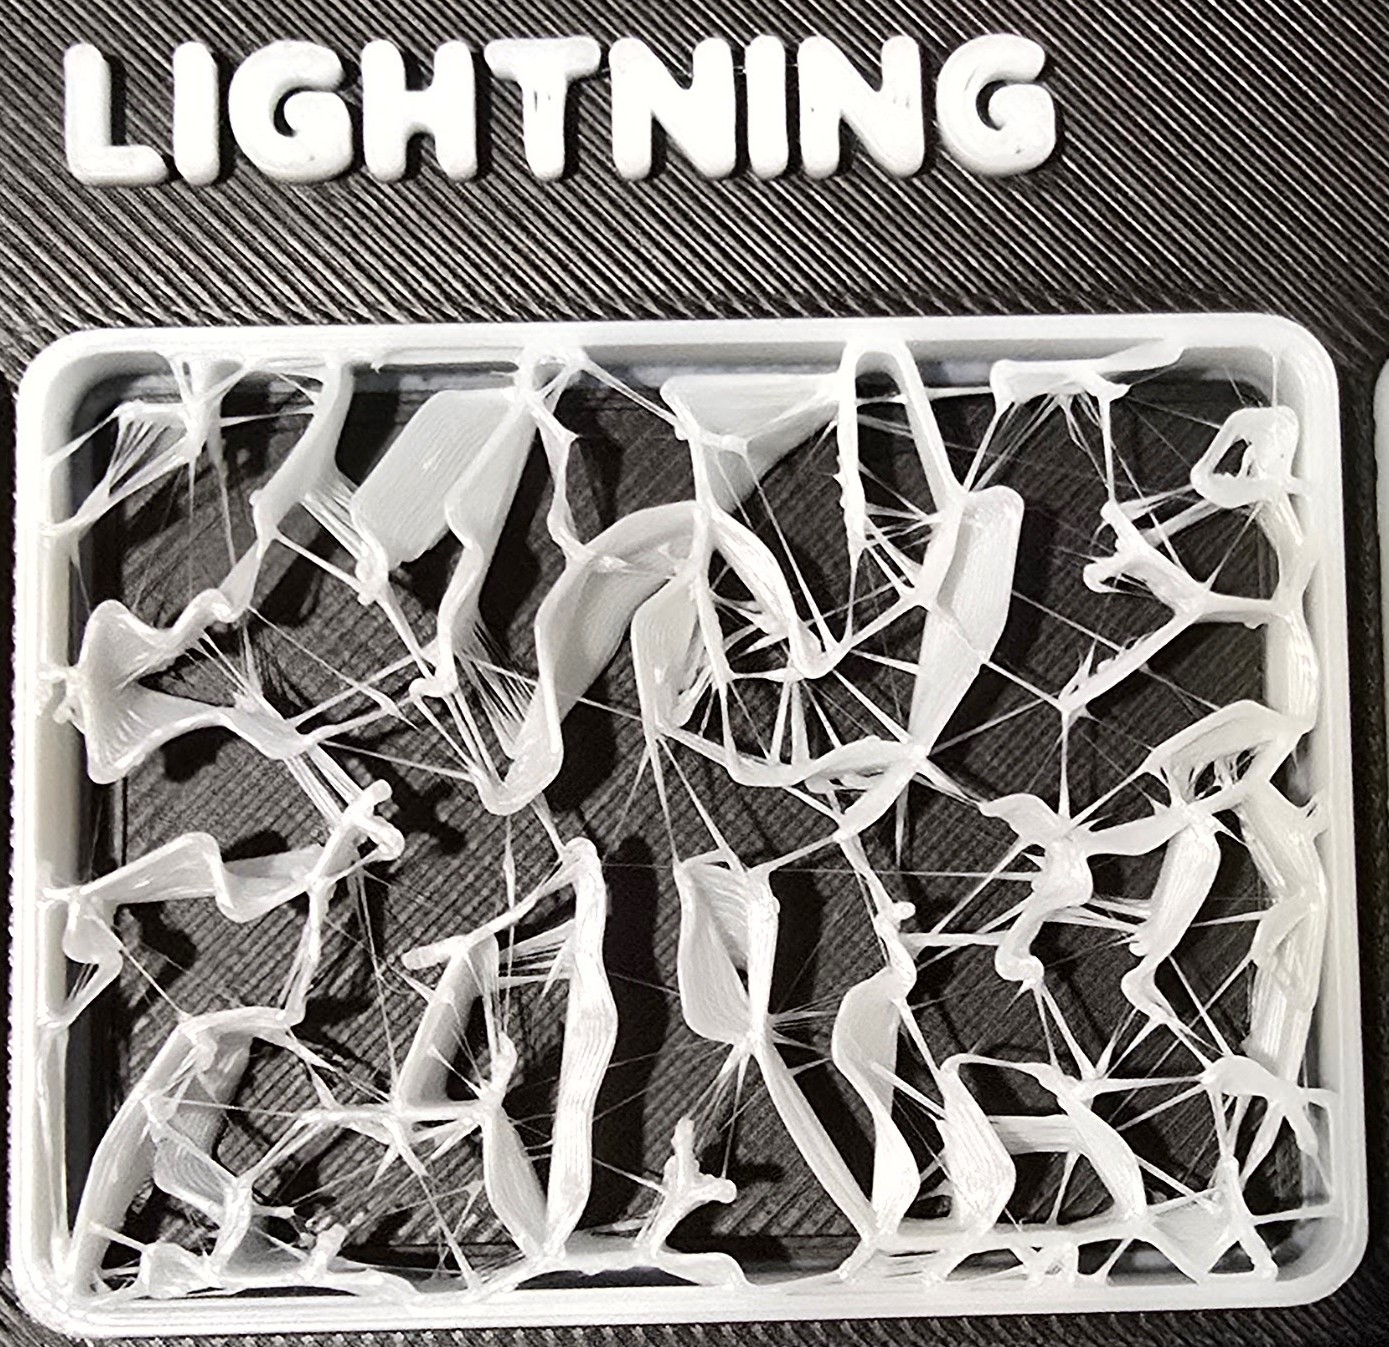
Lightning infill is the opposite of a fixed lattice. It only connects the places that structurally need connecting, and skips the rest. On a well-behaved part it's a genuine material and time saver. On a part where the slicer's solver has to reach across gaps, it can look like a bowl of spaghetti before you realize what's going on. We included it in the panel because it's worth understanding — not as a default, but as a tool for hollow parts once you know how to feed it.
What we actually run
For a part that gets held, twisted, or loaded, gyroid. For a stiff box or bracket where you want predictable strength, cubic. For a draft or a part where speed matters more than finish, grid — and accept the stringing, or plan to clean it. For a visible piece where you don't want strands showing across open cells, concentric or gyroid, because their compact toolpaths hide whatever the machine does produce.
And if you're printing something hollow where you want the material budget to drop, that's the one to try lightning — on a part you're willing to redo if the solver goes wrong.
The setting that changes everything
Pattern matters, but it's not the whole story. The stringing you're seeing in those honeycomb and grid tiles is driven by a handful of slicer settings — retraction, temperature, flow, travel speed, and combing (the setting that keeps travel moves inside the part instead of across open space) — that we break down in full in our guide to fixing stringing. Those settings decide how much the machine strings; the pattern decides how visible it is. If you pick a pattern with open cells and leave the stringing settings at default, you're stacking risk on top of risk. Get the stringing side under control first, then pick the pattern for the job.
Bottom line
Don't default to whatever the slicer gave you, and don't pick a pattern for the name. Ask yourself three things: does this part need to be stiff in every direction, does it need to be fast, and am I willing to live with — or clean off — the stringing the pattern will make visible? Answer those and the pattern takes care of itself. For most parts, that answer is gyroid.
What you actually need
We printed this whole panel on Overture PLA+, and the rest of the gear that makes this easier to measure and repeat is genuinely modest. A pair of digital calipers to confirm your walls and density are what you think they are, and desiccant packs to keep the filament dry so stringing is about your settings and not about damp plastic. If you want the part to look clean after the fact, a good tool kit for cleaning and deburring is what makes a stringy-but-strong print presentable.
Frequently asked questions
What's the best infill pattern for strength?
For strength in every direction, gyroid. For stiffness in the directions a part is most likely to be loaded, cubic or triangular. The "best" depends on which way the part gets stressed — if you can't tell, gyroid is the safe default.
Which infill pattern strings the most?
The ones with wide open cells and long straight runs — honeycomb, archimedean chords, cross hatch, grid, and rectilinear — show it the most. They're cheaper and faster, but the nozzle travels across open space a lot, so any stringing your machine produces has nowhere to hide. That's not the same as the pattern *causing* the stringing — your retraction and temperature do that — it's that the open cells put every strand on display. If a clean finish matters, pick a compact pattern like concentric or gyroid, where the strands land on existing lines and mostly disappear.
What infill percentage should I use?
For functional parts, 10–20% is the sweet spot for most PLA. For a part that gets real load, go 20–40% and lean on a stiff pattern like gyroid or cubic. Below 10% you start trading away structural integrity, and above 40% you're mostly paying in time and material for a little extra you usually don't need.
Why did my infill look like spaghetti?
That's usually lightning (or a similar sparse-solver pattern) on a part where the slicer had to reach across gaps, or a stringing-prone pattern run with stringing settings at default. It's fixable: either switch to a denser, more compact pattern, or dial in the stringing settings first and keep the efficient pattern.
Does infill pattern matter if the part is decorative?
If the infill is fully hidden behind solid walls, the pattern mostly affects time and material — so pick the fast, cheap one. But if you're printing in a material that shows at the edges, or you plan to cut or sand the part, a compact pattern like concentric or gyroid will give you cleaner breaks and less cleanup, because the strands land on existing lines instead of spanning open space.
This page may contain affiliate links. As an Amazon Associate I earn from qualifying purchases.